Time Required: 60 minutes
Class Materials:
- 5GB of disk space
- an ASCII text editor
Next we are going to add some shared disk to our new freshly minted VMs
VMware Workstation makes the allocation of shared disk to VMs very simple. Shared disk has been the biggest obstacle to create Oracle RAC clusters at home, but now VMware gives us a reliable and portable solution that does not require fire-wire hacks, your own NFS server or a SCSI disk array.
Best of all this whole solution can exist on a single laptop, so you can take your RAC on the road.
Make sure both VMs are shut down. If you want to make a clone of your progress then now is your last chance to do so without the complication of shared external disk.
We will add a new disk to Orpheus first, and then add the same disk into Eurydice.
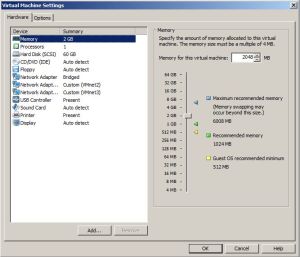
Using the VMware Workstation menu, right click on Orpheus and select Settings.
This will bring up the Virtual Machine Settings menu. Click on the Add button.
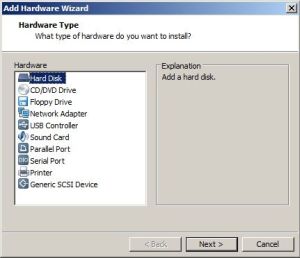
At the Add Hardware Wizard menu, select Hard Disk and click Next.
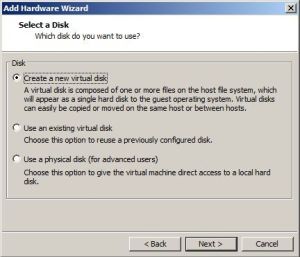
Select Create a new virtual disk and click Next.
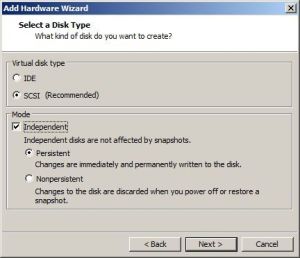
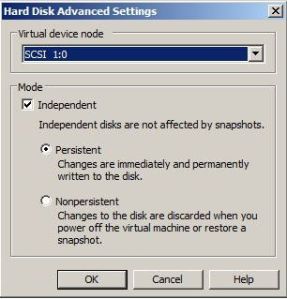
When the Select a Disk Type menu appears, select SCSI (Recommended) and for mode check Indepenent and the radio button Persistent.
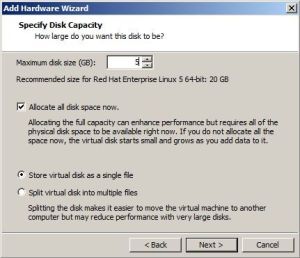
When the Specify Disk Capacity menu appear, set the new disk size at 5GB. This should be just enough to support our demo RAC database. If you have an abundance of disk space then by all means set the disk size much larger.
Check the All all disk space now. button and Store virtual disk as a single file
NOTE: These last two options are very important for our RAC. Trying to create a shared disk with VMware Workstation using thin-provisioning will result in disk corruption.
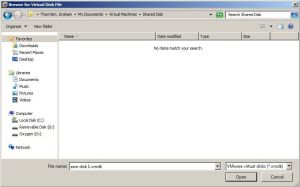
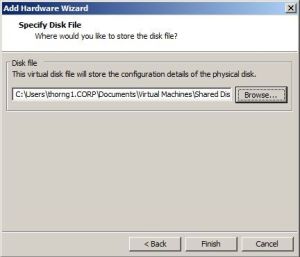
Next VMware Workstation will ask where you want to store your new disk and what you want to call it. By default it will want to place the virtual disk in the same directory as the rest of the Orpheus VM. However this new disk is to be shared, so I prefer to place it in a separate directory.
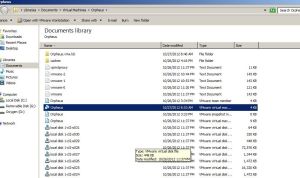
VMware Workstation stores its VMs by default in the user’s Documents directory under a sub-directory called Virtual Machines. In this directory you will find sub-directories for both our VMs Orpheus and Eurydice. I suggest creating a new sub-directory here called Shared Disk and storing our new virtual disk in the Shared Disk directory with the name asm disk 1.vmdk.
VMware will ask you confirm your selection. Press Finish to confirm.
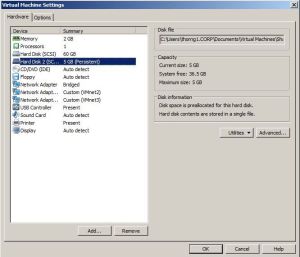
Now we need to move our new disk to a different virtual SCSI device within the VM. In order to avoid all manner of cluster disk issues, we need to place the shared disks on a different SCSI controller to the local disks.
Highlight the Orpheus VM in the VMware Workstation menu and select Settings. When the Virtual Machine Settings menu appears, highlight Hard Disk 2 and select the Advanced button on the right hand side.
The Hard Disk Advanced Settings menu allows to modify the Virtual device node. By default this will be set to SCSI 0:1, but we need to change this to SCSI 1:0. This will move our new disk to SCSI controller 1, device 0.
Next we will have to resort to a little hacking to make our shared disk really sharable. We are now leveraging VM functionality that is not really supported in VMware Workstation 8, but does appear to work, at least for demo purposes.
Navigate to the directory where the Orpheus VM files are stored, in most cases this will be Documents/Virtual Machines/Orpheus. In there you will find a file called Orpehus.vmx
The VMX file contains the hardware profile of the VMs we have created. Before we do anything else, make a copy of it so we have something to go back to if we make a mess.
Open the VMX file with an ASCII editor. Make sure you have an editor able to open and save in ASCII format. Word Processors are a poor choice here as they are more likely to add symbols that will corrupt the file.
The VMX file is a unsorted mess. Why VMware doesn’t perform a simple sort on the file before saving it to disk is a mystery. Still at least it isn’t some gigantic XML monstrosity. I recommend that if your editor allows it, you perform a sort on the entire file and save it back to disk before making any changes.
This is where the magic happens, and I have to acknowledge it was Dan Norris who figured this out, not me. In order to make our new disk fully clusterable, we are going to add the following directives to the VMX file:
disk.locking = "FALSE"
diskLib.dataCacheMaxSize = "0"
diskLib.dataCacheMaxReadAheadSize = "0"
diskLib.dataCacheMinReadAheadSize = "0"
diskLib.dataCachePageSize = "4096"
diskLib.maxUnsyncedWrites = "0"
scsi1.sharedBus = "virtual"
These changes force the VMs to not try to buffer reads and writes to the disk, which would result in block corruption to the shared database. The new directives can be added anywhere in the VMX file, although I tend to add them immediately above the SCSI settings.
The following is a sub-section taken from the VMX file of my Orpheus VM. I have not dumped the entire file for the sake of clarity.
replay.supported = "FALSE"
disk.locking = "FALSE"
diskLib.dataCacheMaxSize = "0"
diskLib.dataCacheMaxReadAheadSize = "0"
diskLib.dataCacheMinReadAheadSize = "0"
diskLib.dataCachePageSize = "4096"
diskLib.maxUnsyncedWrites = "0"
scsi1.sharedBus = "virtual"
scsi0.pciSlotNumber = "16"
scsi0.present = "TRUE"
scsi0.virtualDev = "lsilogic"
scsi0:0.fileName = "local disk 1-cl2.vmdk"
scsi0:0.present = "TRUE"
scsi0:0.redo = ""
scsi0:1.present = "FALSE"
scsi1.present = "TRUE"
scsi1.virtualDev = "lsilogic"
scsi1:0.fileName = "C:\Users\thorng1.CORP\Documents\Virtual Machines\Shared Disk\asm disk 1.vmdk"
scsi1:0.mode = "independent-persistent"
scsi1:0.present = "TRUE"
serial0.fileType = "thinprint"
serial0.present = "TRUE"
sound.autodetect = "TRUE"
Now navigate to the VMX file for Eurydice and add the same directives for diskLib and scsi1. You do NOT need to use the VMware interface to make these changes. Editing the VMX file directly is the better option.
The following is taken from the VMX file of my Eurydice VM. Again I have not dumped the entire file for the sake of clarity. As you can see it should match Orpheus exactly.
replay.supported = "FALSE"
disk.locking = "FALSE"
diskLib.dataCacheMaxSize = "0"
diskLib.dataCacheMaxReadAheadSize = "0"
diskLib.dataCacheMinReadAheadSize = "0"
diskLib.dataCachePageSize = "4096"
diskLib.maxUnsyncedWrites = "0"
scsi1.sharedBus = "virtual"
scsi0.pciSlotNumber = "16"
scsi0.present = "TRUE"
scsi0.virtualDev = "lsilogic"
scsi0:0.fileName = "local disk 1-cl2.vmdk"
scsi0:0.present = "TRUE"
scsi0:0.redo = ""
scsi1.present = "TRUE"
scsi1.virtualDev = "lsilogic"
scsi1:0.fileName = "C:\Users\thorng1.CORP\Documents\Virtual Machines\Shared Disk\asm disk 1.vmdk"
scsi1:0.mode = "independent-persistent"
scsi1:0.present = "TRUE"
serial0.fileType = "thinprint"
serial0.present = "TRUE"
sound.autodetect = "TRUE"
Now you can start up both Orpheus and Eurydice. As you do so, you might notice a small warning in the bottom right hand corner of the VMware window that states:
Clustering is not supported for WMware Workstation – this setting will be ignored
Don’t worry about this. This is expected behavior.
When Orpheus is full booted up, we should be able to create a partition table on the new shared disk, which will be presented to Linux as /dev/sdb.
In the following example we create a partition at the 1MB offset.
[root@orpheus ~]# fdisk /dev/sdb
Device contains neither a valid DOS partition table, nor Sun, SGI or OSF disklabel
Building a new DOS disklabel. Changes will remain in memory only,
until you decide to write them. After that, of course, the previous
content won't be recoverable.

Warning: invalid flag 0x0000 of partition table 4 will be corrected by w(rite)

Command (m for help): u
Changing display/entry units to sectors

Command (m for help): n
Command action
   e   extended
   p   primary partition (1-4)
p
Partition number (1-4): 1
First sector (63-10485759, default 63): 2048
Last sector or +size or +sizeM or +sizeK (2048-10485759, default 10485759):
Using default value 10485759

Command (m for help): w
The partition table has been altered!

Calling ioctl() to re-read partition table.
Syncing disks.
Okay cool. We have created a partition on the new shared disk. Now we can stamp it for use by ASM by using the ASMLib we installed back in Part V.
[root@orpheus ~]# oracleasm createdisk DATA /dev/sdb1
Writing disk header: done
Instantiating disk: done
To verify the operation worked as expected, we can list the ASM disks as follows:
[root@orpheus ~]# oracleasm listdisks
DATA
Now we need to see if the changes we just did are visible to Eurydice. Log into Eurydice as root and start the fdisk command. Now if we list the partition table we should see that one already exists, as we just created it on Orpheus.
[root@eurydice ~]# fdisk /dev/sdb

The number of cylinders for this disk is set to 1448.
There is nothing wrong with that, but this is larger than 1024,
and could in certain setups cause problems with:
1) software that runs at boot time (e.g., old versions of LILO)
2) booting and partitioning software from other OSs
   (e.g., DOS FDISK, OS/2 FDISK)

Command (m for help): p

Disk /dev/sdb: 5368 MB, 5368709120 bytes
181 heads, 40 sectors/track, 1448 cylinders
Units = cylinders of 7240 * 512 = 3706880 bytes

   Device Boot      Start         End      Blocks   Id  System
/dev/sdb1               1        1449     5241856   83  Linux

Command (m for help): w
The partition table has been altered!

Calling ioctl() to re-read partition table.
Syncing disks.
Note: It is important to re-write the partition header table from fdisk so that Eurydice can see the partitioned device /dev/sdb1.
Now we can use ASMLib on Eurydice to scan the devices for any ASM stamped disks:
[root@eurydice ~]# oracleasm scandisks
Reloading disk partitions: done
Cleaning any stale ASM disks...
Scanning system for ASM disks...
Finally if we check to see what was found, we should see that the ASM disk for DATA has been discovered!
[root@eurydice ~]# oracleasm listdisks
DATA
The shared disk is visible to both Orpheus and Eurydice. We are now ready to install our RAC database!
| Article Quick Navigation | ||
|---|---|---|
| Previous Step | Main Index | Next Step |

Hi Gruff,
I’am not able to detect the shared disk in Eurydice machine. i was stuck here.
[root@eurydice ~]# fdisk /dev/sdb
Unable to open /dev/sdb
[root@eurydice ~]#
Please find the configuration file for same machine below.
.encoding = “windows-1252”
config.version = “8”
virtualHW.version = “9”
vcpu.hotadd = “TRUE”
disk.locking = “false”
diskLib.dataCacheMaxSize = “0”
diskLib.dataCacheMaxReadAheadSize = “0”
diskLib.dataCacheMinReadAheadSize = “0”
diskLib.dataCachePageSize = “4096”
diskLib.maxUnsyncedWrites = “0”
scsi1.sharedBus = “virtual”
scsi0.present = “TRUE”
scsi0.virtualDev = “lsilogic”
memsize = “2048”
mem.hotadd = “TRUE”
scsi0:0.present = “TRUE”
scsi0:0.fileName = “local disk 1-cl1.vmdk”
ide1:0.present = “TRUE”
ide1:0.fileName = “F:\Softwares\Rhel-server-5.5-x86_64-dvd.iso”
ide1:0.deviceType = “cdrom-image”
ethernet0.present = “TRUE”
ethernet0.virtualDev = “e1000”
ethernet0.wakeOnPcktRcv = “FALSE”
ethernet0.addressType = “generated”
usb.present = “TRUE”
ehci.present = “TRUE”
ehci.pciSlotNumber = “35”
pciBridge0.present = “TRUE”
pciBridge4.present = “TRUE”
pciBridge4.virtualDev = “pcieRootPort”
pciBridge4.functions = “8”
pciBridge5.present = “TRUE”
pciBridge5.virtualDev = “pcieRootPort”
pciBridge5.functions = “8”
pciBridge6.present = “TRUE”
pciBridge6.virtualDev = “pcieRootPort”
pciBridge6.functions = “8”
pciBridge7.present = “TRUE”
pciBridge7.virtualDev = “pcieRootPort”
pciBridge7.functions = “8”
vmci0.present = “TRUE”
hpet0.present = “TRUE”
usb.vbluetooth.startConnected = “TRUE”
displayName = “Eurydice”
guestOS = “rhel5-64”
nvram = “Eurydice.nvram”
virtualHW.productCompatibility = “hosted”
powerType.powerOff = “hard”
powerType.powerOn = “hard”
powerType.suspend = “hard”
powerType.reset = “hard”
extendedConfigFile = “Eurydice.vmxf”
scsi0.pciSlotNumber = “16”
ethernet0.generatedAddress = “00:0c:29:08:4c:b1”
ethernet0.pciSlotNumber = “33”
usb.pciSlotNumber = “32”
vmci0.id = “1708068035”
vmci0.pciSlotNumber = “36”
tools.syncTime = “FALSE”
uuid.location = “56 4d 6f 40 44 9a cf d6-4f c2 5f 04 59 08 4c b1”
uuid.bios = “56 4d 6f 40 44 9a cf d6-4f c2 5f 04 59 08 4c b1”
cleanShutdown = “FALSE”
replay.supported = “FALSE”
unity.wasCapable = “TRUE”
replay.filename = “”
scsi0:0.redo = “”
pciBridge0.pciSlotNumber = “17”
pciBridge4.pciSlotNumber = “21”
pciBridge5.pciSlotNumber = “22”
pciBridge6.pciSlotNumber = “23”
pciBridge7.pciSlotNumber = “24”
usb:1.present = “TRUE”
ethernet0.generatedAddressOffset = “0”
tools.remindInstall = “TRUE”
vmotion.checkpointFBSize = “33554432”
softPowerOff = “FALSE”
usb:1.speed = “2”
usb:1.deviceType = “hub”
usb:1.port = “1”
usb:1.parent = “-1”
ide1:0.autodetect = “TRUE”
sharedFolder.maxNum = “1”
sharedFolder0.present = “TRUE”
sharedFolder0.enabled = “TRUE”
sharedFolder0.readAccess = “TRUE”
sharedFolder0.writeAccess = “TRUE”
sharedFolder0.hostPath = “C:\Users\Bharath\Downloads\Oracleasm rpms”
sharedFolder0.guestName = “Oracleasm rpms”
sharedFolder0.expiration = “never”
ethernet1.present = “TRUE”
ethernet1.vnet = “VMnet2”
ethernet1.connectionType = “custom”
ethernet1.virtualDev = “e1000”
ethernet1.wakeOnPcktRcv = “FALSE”
ethernet1.addressType = “generated”
ethernet2.present = “TRUE”
ethernet2.vnet = “VMnet3”
ethernet2.connectionType = “custom”
ethernet2.virtualDev = “e1000”
ethernet2.wakeOnPcktRcv = “FALSE”
ethernet2.addressType = “generated”
policy.vm.mvmtid = “”
vc.uuid = “”
ethernet1.generatedAddress = “00:0c:29:08:4c:bb”
ethernet1.pciSlotNumber = “37”
ethernet2.generatedAddress = “00:0c:29:08:4c:c5”
ethernet2.pciSlotNumber = “38”
ethernet1.generatedAddressOffset = “10”
ethernet2.generatedAddressOffset = “20”
scsi1.present = “TRUE”
scsi1.virtualDev = “lsilogic”
scsi1.pciSlotNumber = “34”
scsi1:0.present = “FALSE”
serial0.present = “FALSE”
sound.present = “FALSE”
ide0:0.present = “FALSE”
floppy0.present = “FALSE”
usb:0.present = “TRUE”
usb:0.deviceType = “hid”
usb:0.port = “0”
usb:0.parent = “-1”
Thanks in advance
Hi.
I don’t see a second SCSI disk configured in your VMX file. Here is the relevant section from my Eurydice machine:
scsi1.present = “TRUE”
scsi1.virtualDev = “lsilogic”
scsi1:0.fileName = “C:\Users\thorng1.CORP\Documents\Virtual Machines\Shared Disk\asm disk 1.vmdk”
scsi1:0.mode = “independent-persistent”
scsi1:0.present = “TRUE”
The “asm disk 1.vmdk” file is the same physical file created by Orpheus.
Hope that helps.
Gruff.
I have configured and shared the same created “asm disk 1.vmdk” file in the Eurydice machine.
Thanks Gruff…
I will let you know once i finished this setup successfully…:-)
Hi,
How to proceed with this step on Centos 6.3 where ASMlib is not avaiable?
thanks in advance
Hi,
For RHEL6/CentOS6 systems, use UDEV rules instead of ASMLib.
See my post on installing Oracle 11.2.0.3 on Centos6.3 for details on how to do this.
In fact I prefer UDEV rules to ASMLib, since you don’t need to re-install it after a kernel upgrade.
HTH
Gruff.
I’m currently follow your kind instruction. But I faced failure on this part.
Even If setup your recommendation about modifying property files for making shared disk between 2 nodes, I couldn’t see shared disk on the second node.
Could you suggest additional work-around or activity for making log file?
I’ve experienced too many stupid steps because too many different instructions… But I believe you can fix my problems.
solved the problem,too stupid. -_-;
that kind of disk was only assigned master node. cause of sharing slave node just can search that disk through network after modifying configuration file.
Sincerely
typo…
that kind of disk was only assigned master node.
-> that kind of disk should be assigned only to master node.
I have only single 1TB hard disk in my windows 7 system, on which i have created partition of 100gb
How to configure oracle RAC on single disk
The simplest method to create a RAC when you only have a single Windows system, is to use VMware Workstation and follow the steps outlined above.
You can get an 11gR2 2-node RAC completed for about 40GB of total disk space.
You don’t need to partition your Windows disk, VMware will create VMDK disks on it and they will appear as disks to the virtualized Linux.
Hope that helps.
Gruff
hi,
i faced a problem when i trying to start the 2nd server.
there is error like this
“Cannot open the disk ‘asm-disk1.vmdk’ or one of the snapshot disks it depends on.
Reason: Failed to lock the file”
what can i do now.
is there any way?
Hi Zia,
Check your VMX directives as shown in Part 8.
You might be missing the disk.locking = FALSE setting.
It needs to be in be both VMX files.
Hello Jedi,
Thanks for all the stuff, Document is great, However I am trying to configure on VMware 10 and the shared storage that i created isn’t vmdk but SharedDisk-flat, I named it SharedDisk, How to use it. can you provide some help. Thanks
Hi Gruff! Thank you for the work you have put into this site!
I am trying to get UDEV workinfor 11gR2 in place of ASMLib. I read the Centos 6.4 11G post and it makes sense. However, I have an issue I cannot figure out.
I added 2 disks to the VM’s. so I have /dev/sdb and /dev/sdc:
[root@rac1 rules.d]# /sbin/scsi_id -g -u -d /dev/sdb
36000c29ec12ac428f14337323d2dee67
[root@rac1 rules.d]# /sbin/scsi_id -g -u -d /dev/sdc
36000c29ce0a362a811ebe17e0e98de1f
then I created a udevrules file like so:
[root@rac1 rules.d]# pwd
/etc/udev/rules.d
[root@rac1 rules.d]# ll 99-oracleasm.rules
-rw-r–r– 1 root root 393 Apr 18 21:07 99-oracleasm.rules
[root@rac1 rules.d]# cat 99-oracleasm.rules
KERNEL==”sd?1″, BUS==”scsi”, PROGRAM==”/sbin/scsi_id -g -u -d /dev/$parent”, RESULT==”36000c29ec12ac428f14337323d2dee67″, NAME=”oracleasm/ocfs-disk1″, OWNER=”oracle”, GROUP=”asmadmin”, MODE=”0660″
KERNEL==”sd?1″, BUS==”scsi”, PROGRAM==”/sbin/scsi_id -g -u -d /dev/$parent”, RESULT==”36000c29ce0a362a811ebe17e0e98de1f”, NAME=”oracleasm/asm-disk1″, OWNER=”oracle”, GROUP=”asmadmin”, MODE=”0660″
After a udev_start I do the following:
[root@rac1 rules.d]# ls -al /dev/ora*
total 0
drwxr-xr-x 2 root root 60 Apr 18 20:25 .
drwxr-xr-x 19 root root 4080 Apr 18 21:06 ..
brw-rw—- 1 oracle asmadmin 8, 17 Apr 18 21:05 ocfs-disk1
[root@rac1 rules.d]#
I have looked and looked at the rules file and do not see the problem? Although I am very new to udev…. Any suggestions on how I can resolve this?
Thank you.
Hi Gruff,
Figured out the udev issue for the 11gR2 RAC build. Helps when you follow the steps and do it correctly 🙂 . Sorry for the false alarm. Thanks again for the help!
Gruff , I am trying to update given directives on above screens , but the vmx file is getting courrupted .
Please share me the text editor which used or do we have any work around to address the vmx corruption issues
Sanjeev,
I use a Windows text editor called Textpad, but any ASCII compliant editor should work on the VMX files. Don’t use MS Word or other Word Processors, as they will insert control symbols.
Please help me in this regard – vmx corruption .
and what is the ascii text editor you used to update the vmx files. Please through some light
Hi ,
I have configured the shared disk between the two nodes.. I can able to see the shared disk and partition table from two ..till every this is good..when i delete partition table from node1 ,it also should reflect in node2 right? After delecting partion table of shared disk on node1 .I can able to see the partition table from nade2…
Please help me out of this situation..
Hi,
I am using ESX server, so I can not modify *.vmx file on the host machine. Can I use NFS to create the shared disk instead? Thanks.
BR
Xinyan